 Eddy
Eddy
Your organization has chosen to work with FlexWhere. This page explains the use of FlexWhere’s various apps. Useful to refer users to before the organization goes live.
The two tabs below provide more information about the mobile application. One tab to get you started in the app and one tab to show you how to reserve a workspace. Through the mobile app, you can reserve a workspace, parking space or meeting room just for yourself, no matter what role you have.
The Flexwhere app is available for Android and IOS devices. You can download it from the Apple Appstore (IOS) and the Playstore (Android).
After you download the mobile app from the Playstore or Appstore, it’s time to get started with the app.
When you open the app you will see the following screen:
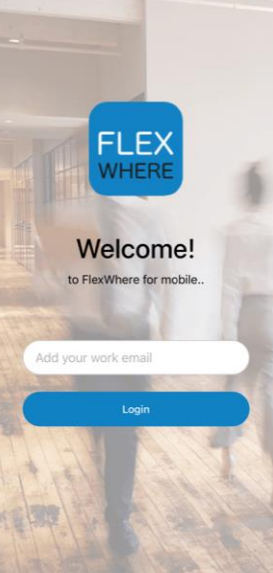
After opening the app, follow these steps;
- Enter your email address in the open field
- You will receive an email to choose your organization (if you do not receive an email, check your spam as well)
- After selecting your organization, you will be automatically logged in
A screen will then be displayed where you can choose your location (if your organization has only one location, this screen will be skipped):
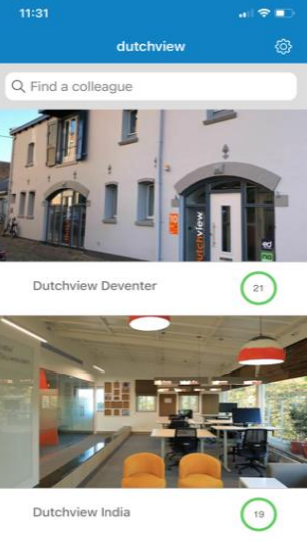
- Select the location where you want to reserve a spot
- After selecting the location, you will be directed to the first map of that location
- Choose the floor
At the bottom of the app, you will see 3 or 4 icons. (Only if your organization has multiple locations do you see 4)

- Locations – Choose the location where you would like to reserve a spot
- Floor – Choose the floor where you want to reserve a spot
- Meeting rooms – Get an overview of all of today’s upcoming meetings
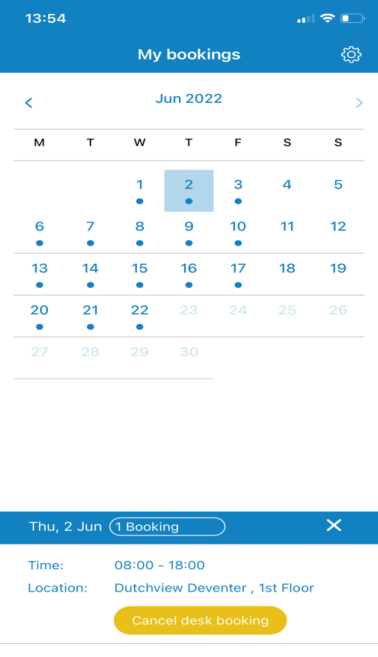
- Reservations – Get an overview of all your own reservations. If there is a dot under the date, you have reserved a workspace on that day. Clicking on that date will bring up a pop-up with the time, location and floor of the reservation. You will also be given the option to delete that reservation. If you click on the time, you will be directed to the workspace you have reserved
Using the search bar, you can directly search for a colleague or type in first aid, for example, to directly search for a trained colleague. A user’s profile shows the data that is available and here the status is also visible. So here you can instantly see if a user has reserved a spot today, is currently occupying a spot, is working from home or is unavailable.
Filter
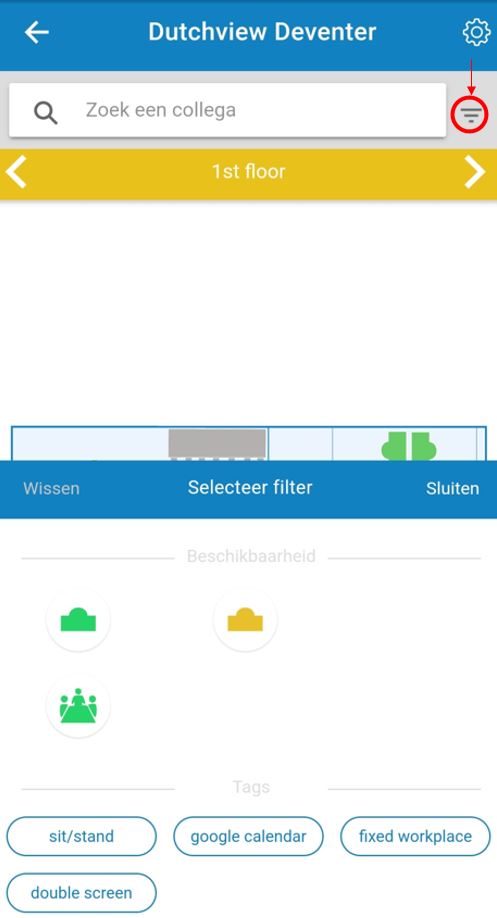
- Before selecting a workspace, parking space or meeting room, you can filter by labels to reserve exactly the spot you want
- Click on the pyramid symbol (circled in red) at the top right to open the filter
- Under “Availability” you can filter by free, reserved or occupied spots
- At “Tags” you can filter by one or more labels
- After selecting the desired labels, click apply
- Then only the places that meet your filter are highlighted
Workplace

- At the bottom of the app, select the date of the day you want to reserve. (Swipe left or right on the date bar to change weeks)
- After selecting the correct date, choose the desired workstation (green workstations can always be reserved, red and yellow workstations can be reserved as long as they do not overlap)
- Now you can reserve a workspace. When you click on “Customized booking,” for example, you still get the option to repeat your booking
- When you select “add to calendar,” you will receive an email to add it to your own calendar
Meeting space
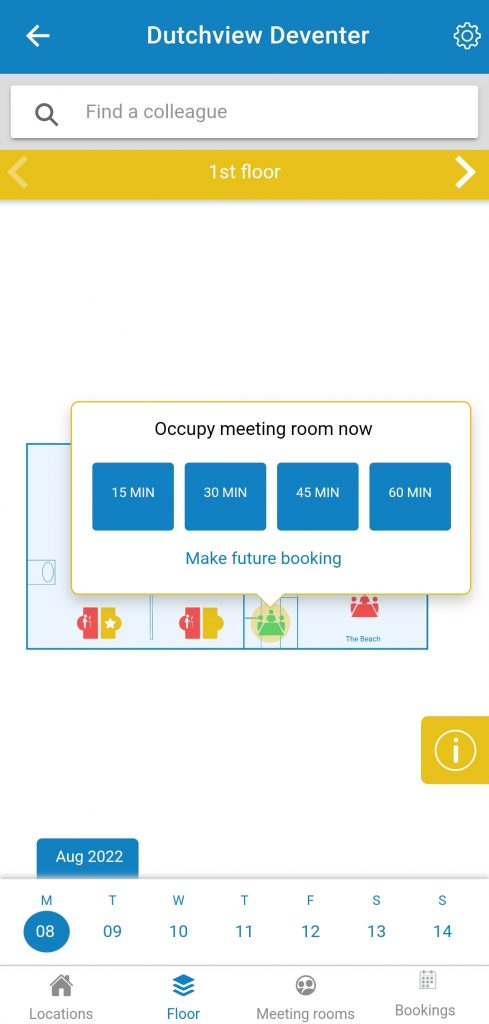
- Click on 15, 30, 45 or 60min to immediately occupy the meeting room
- By clicking “Make future booking,” you can also reserve the meeting room for later in the day or another date
Parking spot
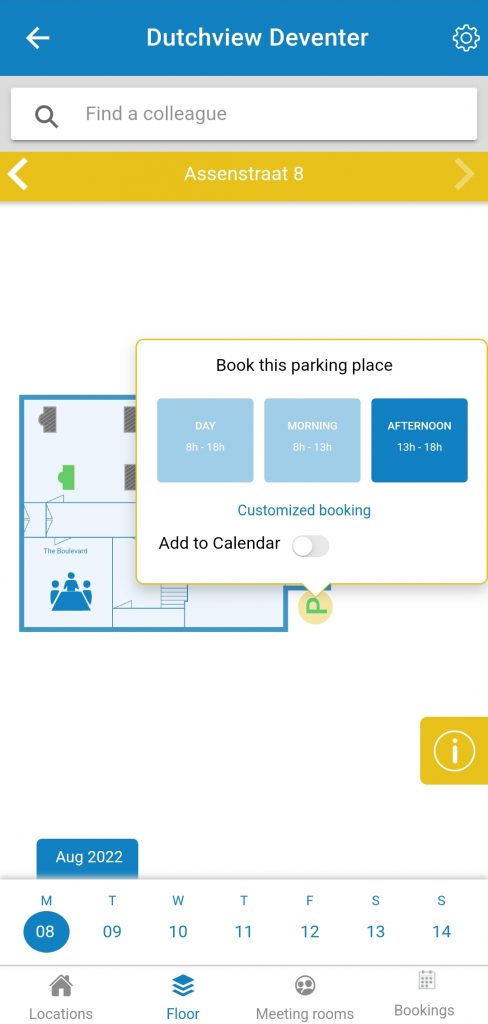
- At the bottom of the app, select the date you want to reserve. (Swipe left or right on the date bar to change weeks)
- After selecting the date, choose the desired parking spot
- Now you can reserve a parking spot. When you click on “Customized booking,” for example, you still get the option to repeat your booking
- When you select “add to calendar,” you will receive an email to add it to your own calendar
You can now use the mobile app to occupy a workspace. Select a workstation, then you get an option “occupied workstation.” Your workspace will remain occupied until you manually release the workspace. If you do not do this, the workplace will remain occupied for 9 hours.
The two tabs below provide more information about FlexWhere’s web environment. One tab to get you started here and one tab to show you how to reserve one or more workstations. Through the web browser, you can reserve a workspace, parking space or meeting room for yourself. Thereby, users with the role Admin, Manager or Desk Planner can also reserve multiple workstations or a workstation for another person (also external).
The web application can be accessed through a URL chosen by the organization. This looks like this > (customer name).flexwhere.com
Het gebruik van de web omgeving is vrijwel gelijk aan die van de desktop applicatie.
On the web page, you must first log in with your email address before you can place a reservation. You can only access the organization’s environment if you are known as a user with this email address. You will receive an email with a link and when you click on it you will be logged in.
Following this, you will be shown the map of the organization. This one will look something like this;

- On the left you will find the calendar, the floors of the building and the filter functions. Here you can select which date you want to reserve a spot and see which spots are already reserved on that date. To find the right place, you can use the filter functions
- If you click on the icon at the top right, you will see the following screen;
- “Users” – Here you get an overview of all users along with their status available, unavailable or external
- “Meetings” – Here you can see all upcoming meetings for the current day
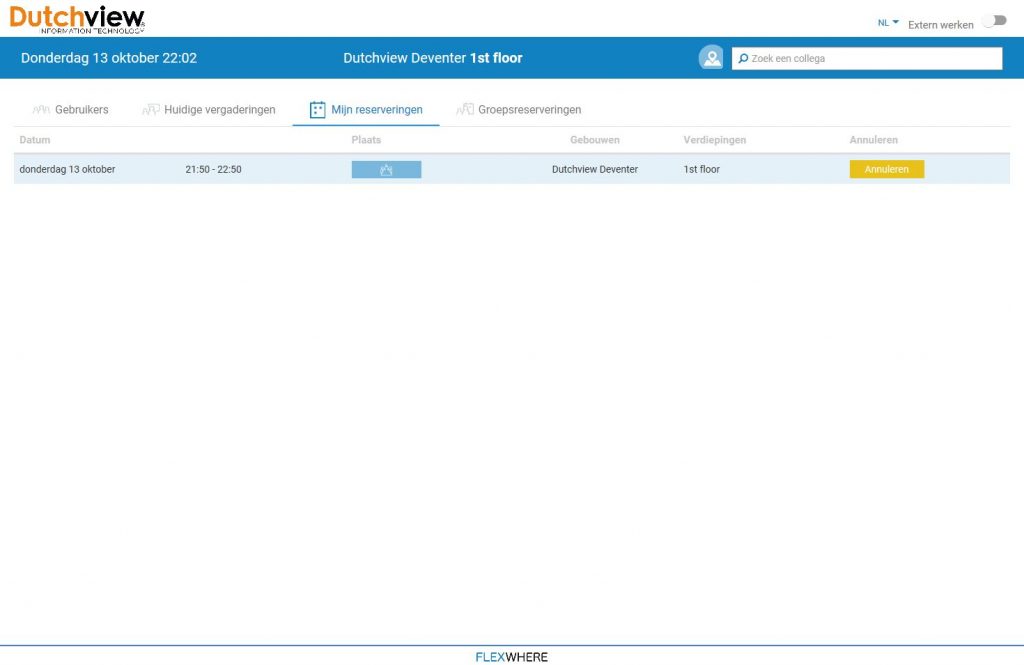
- “My Reservations” – This is where all your own upcoming reservations can be seen
- “Group Reservations” – Here you can see the group reservations that you have created yourself. Only users with the role Admin, Manager or Office Planner can do this
- On the top right, you can also search for a colleague, to see if they are present in the office or working externally, and by clicking on the person you can even see at which workstation, if available.
Using the search bar, you can directly search for a colleague or type in first aid, for example, to directly search for a trained colleague. A user’s profile shows the data that is available and here the status is also visible. So here you can instantly see if a user has reserved a spot today, is currently occupying a spot, is working from home or is unavailable.

To reserve a workspace in the web environment, follow these steps:
- Select appropriate floor on the left
- On the calendar at the top left, select the desired reservation date
- Select the workspace you wish to reserve
- Select how long you want to reserve and whether this reservation should repeat itself
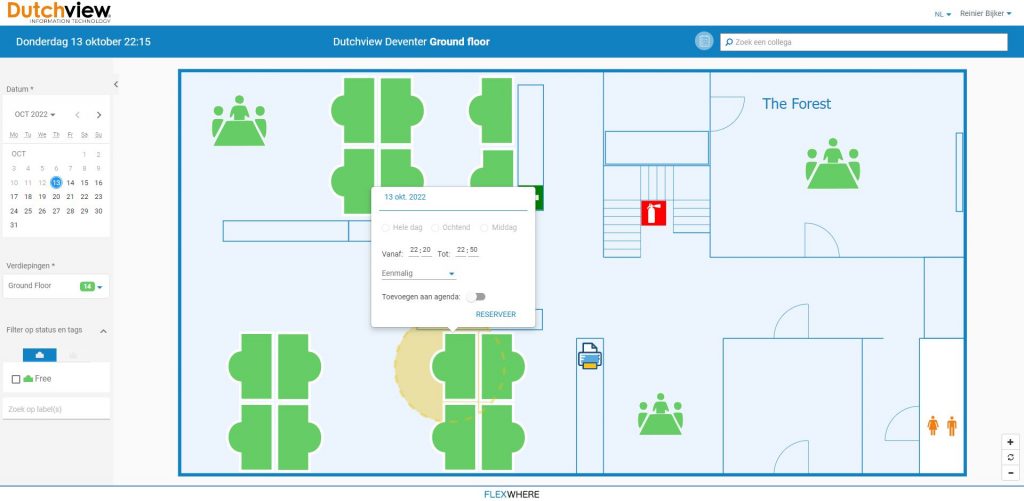
After making the reservation, you get a notification that the reservation was successful.
Admins, Managers and Desk Planners can also use the web environment to reserve multiple workstations (group reservation) or a workstation for someone who does not have access to your environment.
You can reserve multiple workstations by holding down the left CTRL button and then left-clicking to select the workstations.
If you want to reserve a workspace for one other person only, you can right-click once on the
click desired workspace to reserve it.
You can now occupy a workspace through the web environment. Echter moet je dan wel ingelogd zijn (met je e-mailadres). Select a workstation, then you get an option “occupied workstation.” Your workspace will remain occupied until you manually release the workspace. If you do not do this, the workplace will remain occupied for 9 hours.
In the three tabs below, you will find more information about FlexWhere’s Desktop application called FlexWhere for Desktop. This application is available for;
- Windows
- MacOS
- Linux
FlexWhere for Desktop can also be used through a virtual environment, such as Citrix, VMWare or RDP.
Click the button below to download FlexWhere for Desktop;
The desktop application works almost the same as the web environment. Here, however, you have the additional option of being able to occupy workstations. FlexWhere for Desktop is the software that is installed on devices within your organization.
FlexWhere for Desktop automatically determines who is logging in by checking your Username, Device ID and IP address.
If you are working on a laptop known to FlexWhere, you will get a pop-up asking you to indicate where you are. If your laptop is connected to a registered docking station, you won’t get this pop-up. If you work on a non-flexible device, such as a desktop, its device ID can be linked to a workspace to automatically occupy your workspace for you when you work here.
When you have FlexWhere for Desktop installed locally on an Apple (MacOS) device, you will see a green or red icon appear right at the top of the screen. This is the FlexWhere application.

On a Windows system, you will find have at the bottom right of your screen in the taskbar.
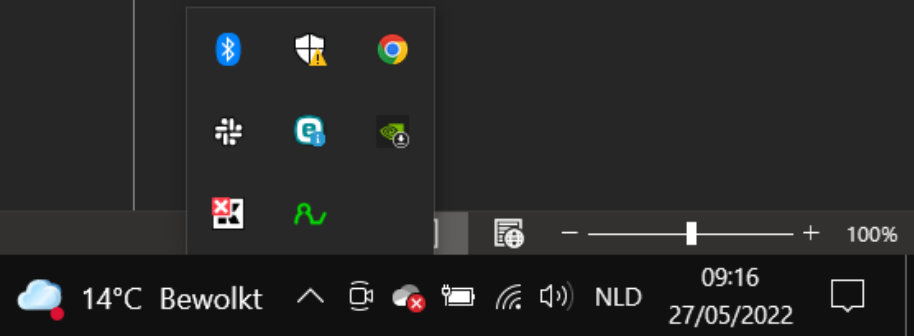
A green poppet means you have been granted access to your organization and thus your IP address is known. In other words, whether you are working within a trusted network of your organization. If the icon is red, then you have not been granted access because your IP address is not known.
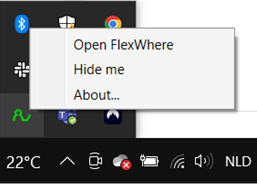
When you right-click on the FlexWhere symbol, you have the option in the drop-down menu to share your information with colleagues or to hide it, by clicking “hide me” or “show me.” The Admin of the organization determines what the default setting is.
If you click “about” in the drop-down menu, you will see the information FlexWhere recognizes on your device.
When you open FlexWhere for Desktop, you first get to choose which building you want to go to. If only one building is in the system, the first floor plan is immediately displayed.
- On the left you will find the calendar, the floors of the building and the filter functions. Here you can select which date you want to reserve a spot and see which spots are already reserved on that date. To find the right place, you can use the filter functions
- If you click on the icon at the top right, you will see the following screen;

- “Users” – Here you get an overview of all users along with their status available, unavailable or external
- “Meetings” – Here you can see all upcoming meetings for the current day
- “My Reservations” – This is where all your own upcoming reservations can be seen
- “Group Reservations” – Here you can see the group reservations that you have created yourself. Only users with the role Admin, Manager or Office Planner can do this
- On the top right, you can also search for a colleague, to see if they are present in the office or working externally, and by clicking on the person you can even see at which workstation, if available.
Using the search bar, you can directly search for a colleague or type in first aid, for example, to directly search for a trained colleague. A user’s profile shows the data that is available and here the status is also visible. So here you can instantly see if a user has reserved a spot today, is currently occupying a spot, is working from home or is unavailable.

The following is how you can reserve a workspace:
- On the left side, select the appropriate floor
- On the left side, select the desired date for the reservation
- Select the workspace you want to reserve and click on it with your left mouse button
- Select how long you want to reserve and whether the reservation should repeat itself
To manually occupy a workstation, do the following (this is only necessary if a device is not attached to the workstation):
- Open Flexwhere for Desktop by quickly clicking 2 times on the green FlexWhere icon or first right-click once on the green FlexWhere icon and then select “open FlexWhere”
- Select the appropriate floor and then left-click to select the workspace you currently want to occupy (the last visited floor is automatically displayed again the next time you open FlexWhere for Desktop)
- Now you get a pop-up and here you click on “Occupy workspace now” at the top. Next, the workplace will turn red
You can automatically occupy a workplace (auto-claim) in the following way:
- Reserve your workspace;
- Open your FlexWhere for Desktop, based on your outgoing IP and device name, which are known in FlexWhere, the app checks to see if you are present. Then the workspace you reserved (from yellow to red) is automatically occupied.
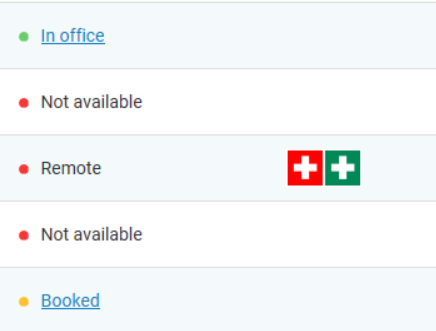
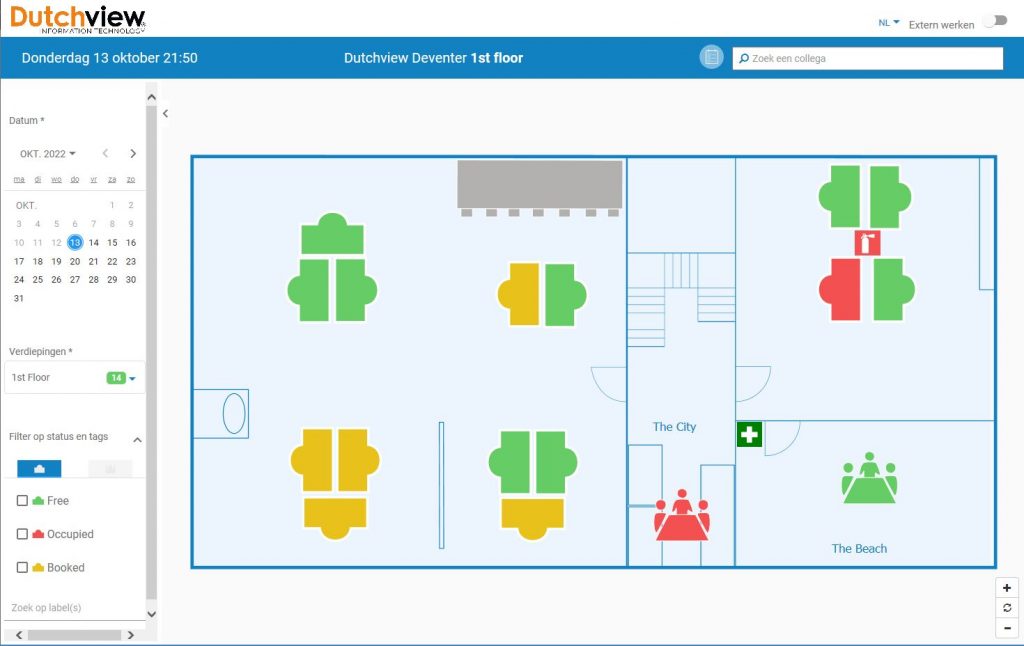
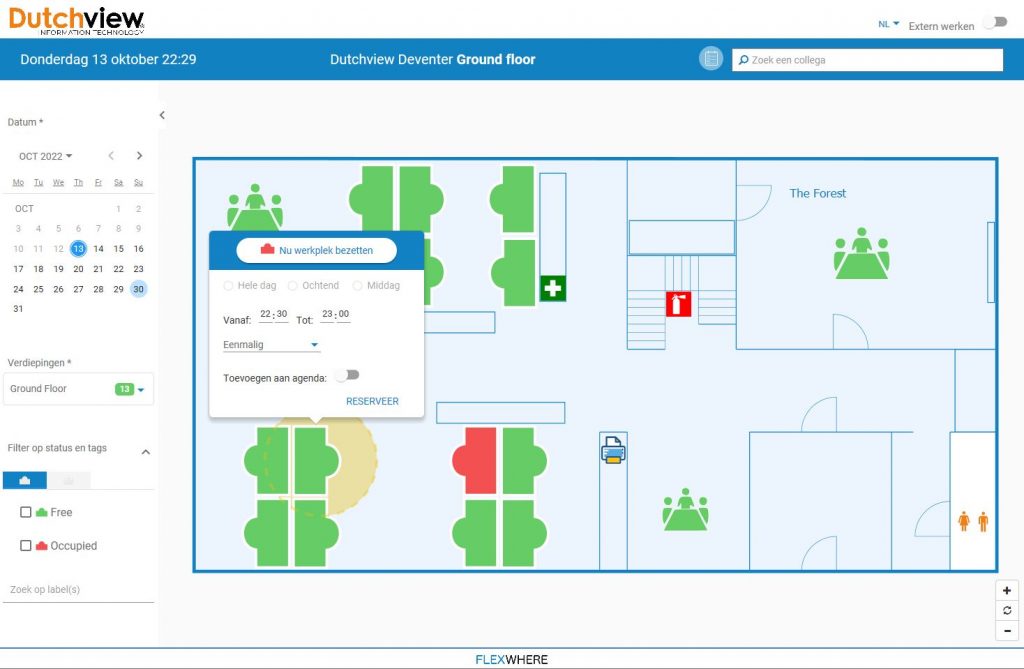
Standard meaning of Workplace colors

- Gray; This workstation is blocked and cannot be occupied or reserved
- Yellow; This color has 2 meanings. 1. Reserved by another. 2. The workstation was occupied, without the person reserving the spot, and locked the screen. Your workplace is then not released immediately, but remains yellow for a while. By clicking on the workspace you can see who has reserved the spot and for how long
- Red; Occupied by another. By clicking on the workplace you can see who is sitting there
- Green; Free to reserve
Standard meaning of meeting room colors
- Green; This space is currently vacant. You can occupy it directly or schedule a reservation
- Red; This space is currently occupied. Click on the space for more info about the meeting, such as time slot and topic
- Yellow; The room is currently reserved, but no one is present (*Only applicable when using sensors or the meeting room app)

Click the button below for information